Last time I wrote about crunch in the games industry, and why it’s a really, really bad practice. It was both fun and a bit distressing to see how much attention that text has gotten in just one week. Studies have time and time again shown that working extensive overtime is bad for you, the product and the rest of the team. In almost all other industries overtime is seen as a management failure. The average career length of a Norweigan game developer is around four years, before they quit or are burned out. This time I’ll write about how we at Midnight Hub go about to make our upcoming puzzle game Lake Ridden. We’re a five-man strong team, based in Sweden. The following methodolgy is a suggestion I hope you can find useful when planning your own game!
Before co-founding Midnight Hub I’ve worked at Paradox and Tarsier, among others. Comments and feedback on this piece are always welcome here, or you can find me on Twitter. This is the second part of a blog post series focusing making games in a smarter way. Stay tuned for part three!
Why Talk About Project Management To Control Stress?
There are a lot of factors that can cause stress or burnout. If we focus on work-related burnout or stress symptoms they usually arise from:
1) Feeling like you have little or no control over your work
2) Lack of recognition or reward for good work
3) Unclear or overly demanding job expectations
4) Doing work that’s monotonous or unchallenging
5) Working in a chaotic or high-pressure environment
Having bad project management or unrealistic planning for a project can trigger almost all of the above to come true. Of course, there are things you can’t curb with better planning, like a key member becoming sick or new VAT-regulations for games, but I do believe a lot of things can be planned for. A solid project plan starts with a clear vision for the game. You need to have a strong vision of what your game should be. Sometimes it’s the job of one person, and sometimes it’s a team taking care of this. Having a clear vision for the game takes time to establish, and it will change during the course of your project. Games hate to be made, and it’s a lot of hard work to bring them into this world.
When You Know WHAT to Build You Can Decide HOW
Get everyone aboard for your vision! Talk to people, experiment with a prototype, have your team play similar games, collect art showcasing the style etc. The pre-production for the game is extremely important. Only when you know WHAT you want to build, you can talk about HOW to build it. If you have a healthy approach for the HOW-part, you can hopefully avoid 1, 3, 4 and 5 on the list of stressors!

An example of our forest in Lake Ridden. To the left, you can see step B, while the right (still work in progress) is even past step C. The images are taken about a year apart.
When you establish the vision for your game and work on the pre-production you need to research and list all possible limitations surrounding your upcoming game. By this, I mean a myriad of things such as: typical genre-expectations for a game like the one you want to build, how much money you will have in the bank, accessible memory-usage for your game, average playtime for this kind of a game, release windows etc. All these important limitations should shape the game you are trying to build. I know it’s super boring to focus on limitations when you just want to make a damn good game, but these limitations will work as your framework for setting up the plan and project management for your upcoming game. Establishing any limitations as early as possible will help you define clear goals for the project. They will also serve as a reality check. Is what you’re planning to build reasonable at all, regarding the team size, money and time you got? It’ will help you plot actual deadlines into the calendar.
The A-B-C Treatment For Making Games
Our game Lake Ridden is a fairly linear single-player experience. A mystery game filled with puzzles and story, estimated to take between 3-6 hours to finish. With this in mind, we chopped the game into nine or ten “chapters” for us to work on. One chapter could be the Forest, another one the big Estate which the player explores.

An example of a made-up game, chopped up game using the ABC-treatment. The team works on different parts at different times. Each part is clearly defined. This does not take into consideration things such as marketing, big programming tasks, HR, voice acting etc.
Each chapter gets our ABC-treatment. We have found that it’s not necessary to first do ALL the A-iterations of the game before starting with the Bs, but it sure does help! And you don’t have to do them in the same order as the player progresses.
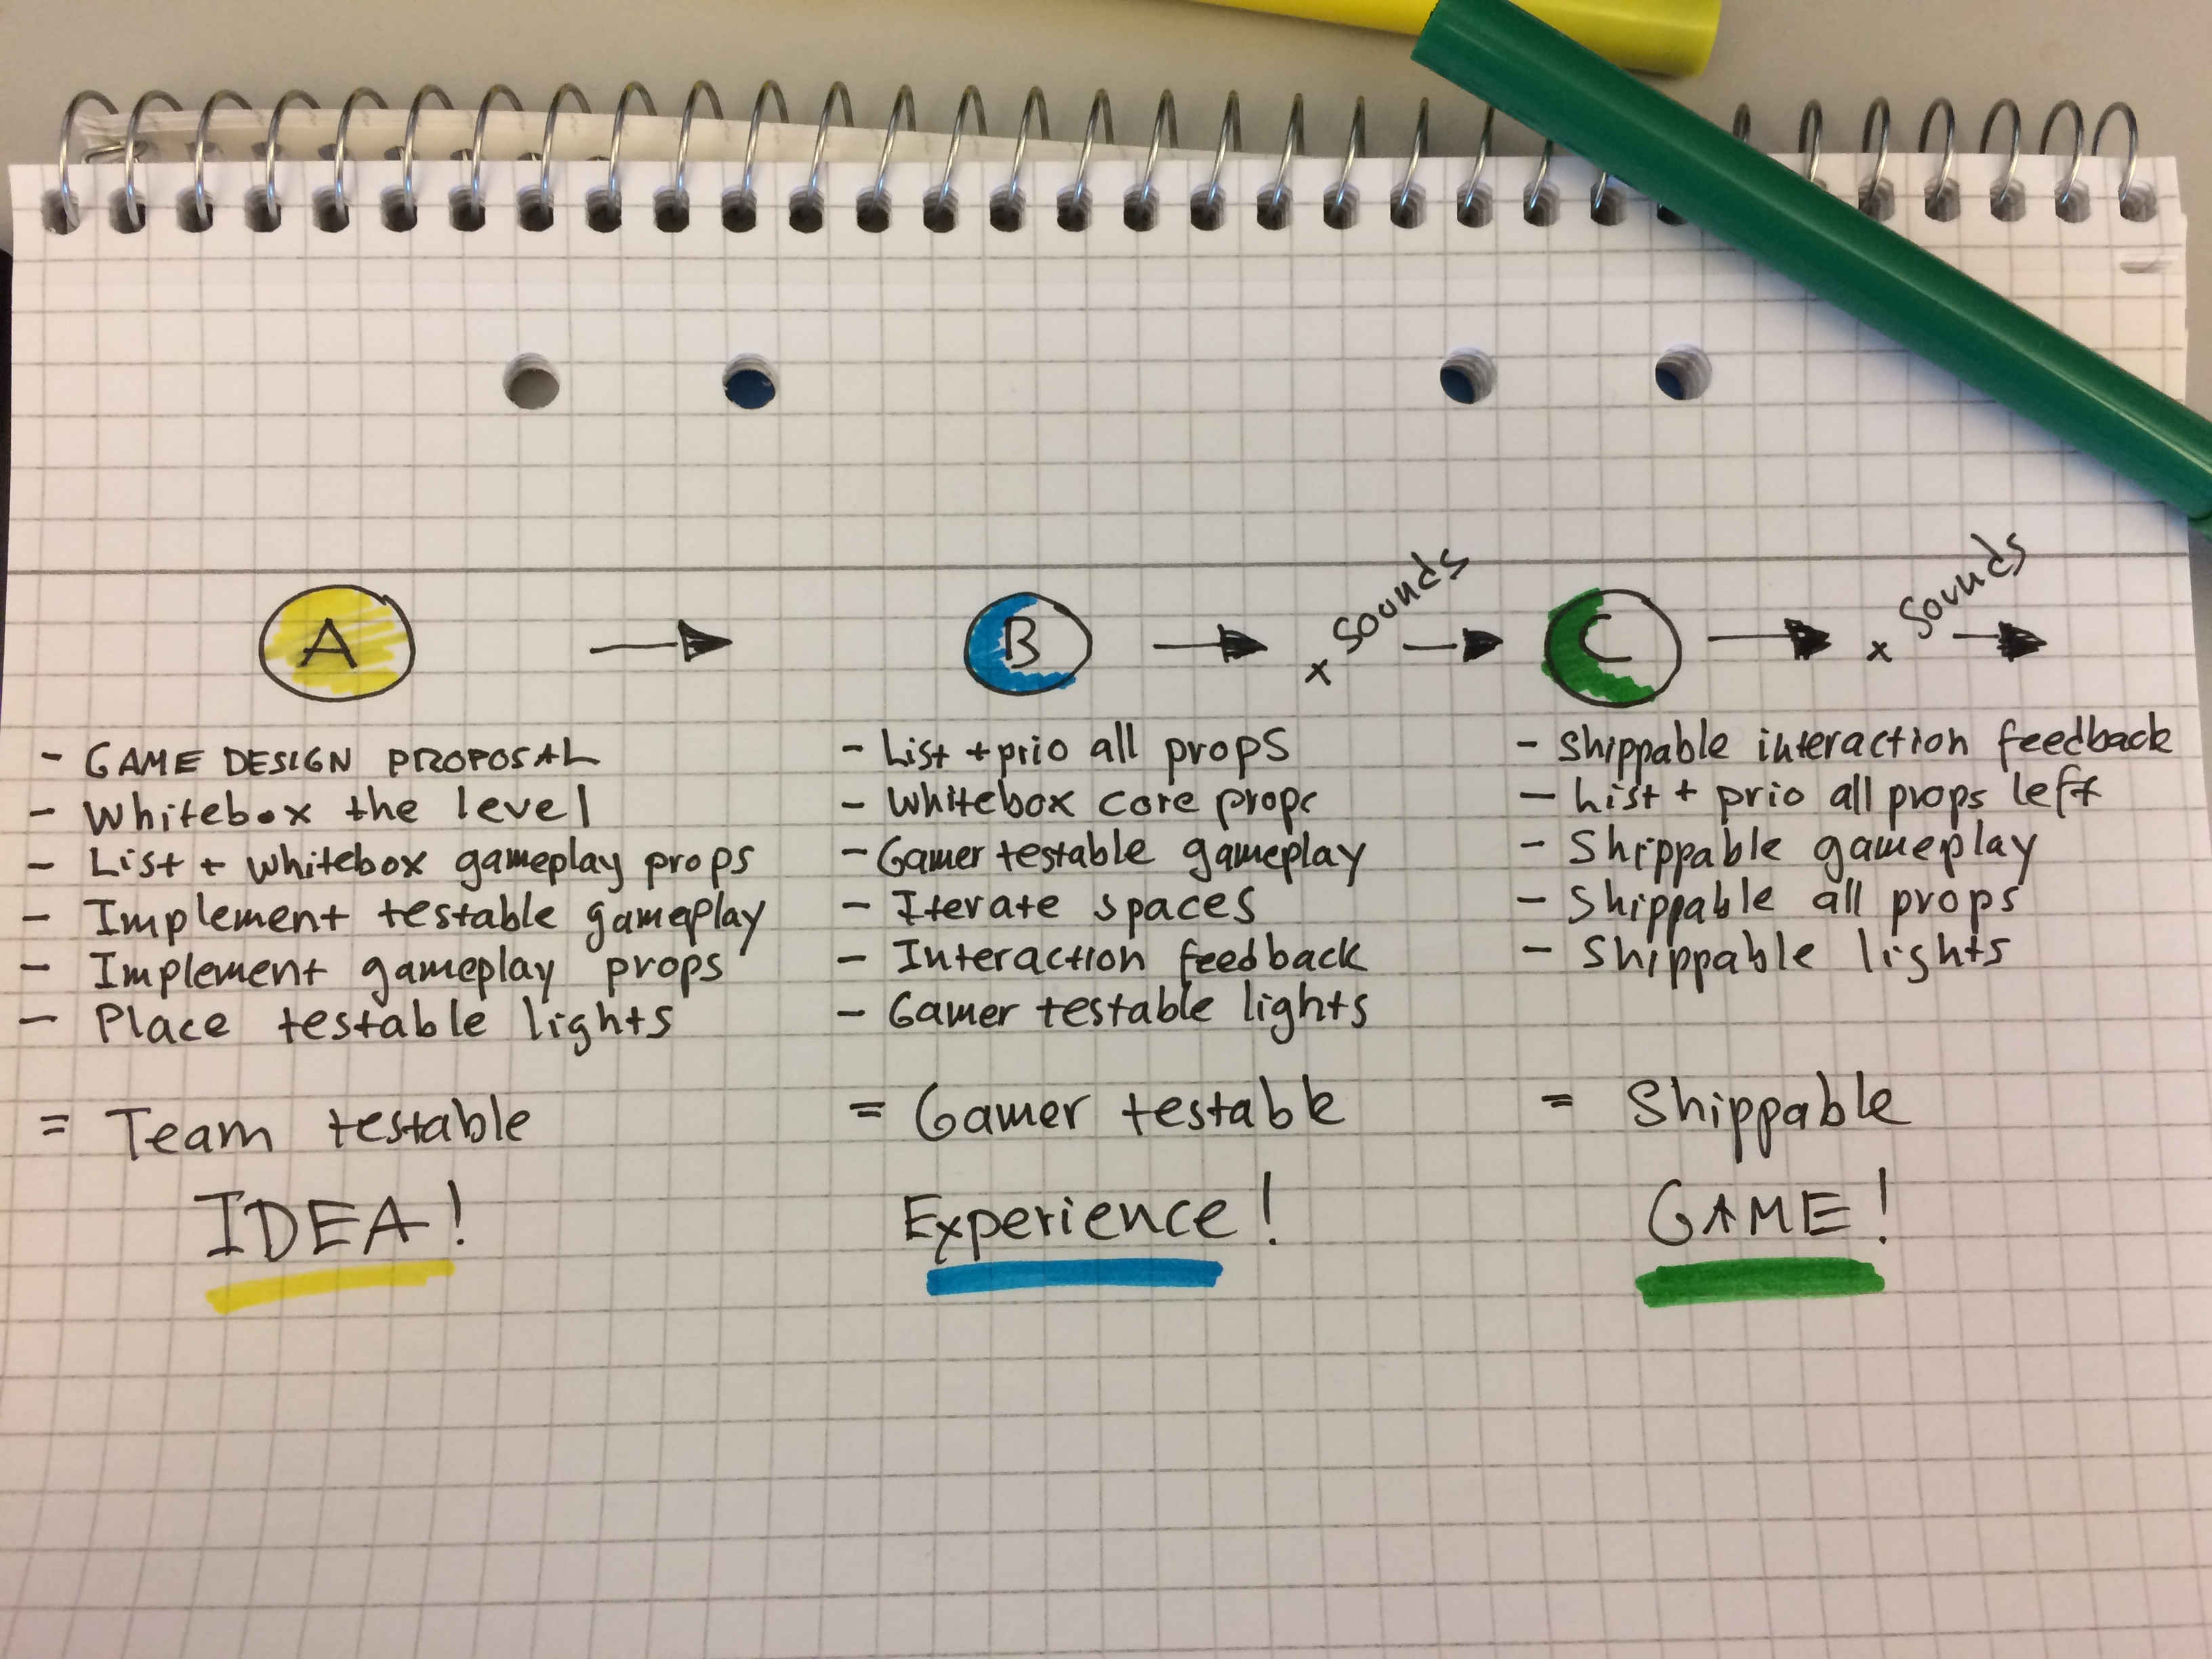
This method is something we developed together, but I must admit our lead programmer Johan was the one who laid the foundations about a year ago. You’ll notice that there might be some things that fall outside these steps, like sound, big programming tasks, voice lines, QA, team management etc. Sometimes things happen in a different order, and sometimes a step takes more time. We view these steps as guidelines. It’s also important to know that we divide all in-game props into three categories:
- Essential gameplay props needed to test the basic gameplay (walls, floor, boxes, a light switch etc)
- Core props needed to convey the idea of the area (chairs, tables, trees etc)
- Detail props that add atmosphere and quality (strains of grass, fireflies, dirty plates in a kitchen, different books on a bookshelf etc)
Step A – the goal is a team testable idea
Let’s have a look at the different steps! Step A should give you a very, very rough testable version of an area in the game. The goal here is for other team members to be able to test the level and give feedback. Step 3, 4 and 5 are often done more or less simultaneously:
- The game design team drafts a game design proposal for the level/area. What is the main gameplay for this area? No one codes anything in this step, they just talk, draw and debate. What are the puzzles? What is the purpose of this gameplay? When they’re done they present it to the whole team to get feedback.
- The art and design team identify and list all crucial gameplay props needed to test the idea of this part of the game.
- Level designers whiteboxes the main environment for this area. Establish the boundaries of this area.
- Whitebox the gameplay and environment props. It’s OK if it’s just white boxes or placeholder ugly stuff. Get them in there!
- Programmers implement the team testable gameplay. Make the basic gameplay work.
- Basic gameplay lights are placed out, to enable another team member to test everything. Or you can just have one big light so people can see the level while testing.

Basically the very same level, about a year apart. The left image shows us testing out the gameplay using ugly placeholder art. The right image is still work in progress, but we’re now done with step C!
When we have this (it usually takes us one week to get this up and running) we can try basic gameplay and see how we feel about it. Does it even work? Is it fun? Does it make sense? Things are extremely rough and often broken at this stage, but that’s OK!
Step B – the goal is a gamer testable experience
The theoretical goal here is for someone from your target audience to be able to try the game, with some help from the devs, at the office. We call this step “What Makes A Kitchen A Kitchen?”. What are the bare minimums to make a convincing kitchen level?
- Art and design team list and prioritizes gameplay props, core props, and detail props.
- Whitebox + implement core props. Core props are the stuff needed to give the level some personality.
- Gamer testable gameplay + gamer testable environments. This means iterating the gameplay and spaces.
- Gamer testable interaction feedback implemented. Just basic interaction feedback, like a sound, a basic particle effect etc. It’s hard to test a game on a gamer if they don’t get any interaction feedback at all from the game.
- Gamer testable lights. Placing out basic lights needed to test the level on a gamer.
When you’re done with step B you should be able to test your game together with someone from your intended audience. We usually spend 1-2 weeks making a B-section. The level will still be a bit confusing for the gamer, and a developer probably needs to help the gamer, but it should be possible to get a response from your audience. Do they understand what you are trying to do, and do they like it? And do remember, as a developer you’ll see a thousand things want to fix at this stage. Resist the urge to start polishing in this phase!
Step C – the goal is to make it shippable
The goal here is to be able to ship if time runs out. You don’t want to have to ship after doing this stage, but if something bad happens to your team or planning you could theoretically ship after this stage. This is the step where you start adding details and the first layer of polish. I can’t stress enough how important it is to lay a solid foundation before starting with C. If you don’t, things will come crashing down and the team will see their work thrown away, which always causes a major hit in morale, not to mention missed deadlines…
The rule of thumb here is to constantly ask yourself: “if we don’t implement X, will the player actually miss X?”. If you don’t implement at least three kinds of trees in a forest the player will probably notice, but if you only have one kind of small pebbles instead of two, they will probably not think about that. This way of thinking can help you prioritize what you should invest your time on here.
- Identify, list and prioritize all props that are left to make.
- Shippable interaction feedback in the game.
- Shippable props (gameplay, core, and detail).
- Shippable gameplay.
- Shippable lights.
When this step is done you hopefully have something you can exhibit at a big conference or to a publisher!
There is no set definition for “shippable”. I think this up to each team and their standards. Some developers are perfectionists and could literally sit and push the pixels on a helmet for days if you let them. If that’s something you can afford, it’s up to you. I think we have a pretty good understanding of what “shippable” means to us as a team.

An example of our planning hanging on the wall, visible to everyone on the team. Each Monday we determine what everyone will be working on until Friday when we close the sprint. Management and leads reality-check the plan each week and adjust accordingly. Each big step, like “Lake A”, is then broken down into smaller, well-defined tasks.
Step D is polishing and adding all those would-be-nice-to-have-ideas you’ve been thinking about since you started the project. If you were building a kitchen it might be some different looking spatulas or three kinds of plates instead of just two. Most teams could probably polish their games forever, so it’s important not to get stuck in this phase too long. At the end of the day, you need to get your game out the door to survive and put food on the table for your team.
A Few Words Of Caution
Please remember that the ABC-method does not involve things such as bug-hunting, marketing, HR, etc. A lot of big programming tasks also fall outside of these steps. And a lot of the times you’ll find a pesky can of worms and one step ends up taking a lot longer than you anticipated. We like to think of these steps as guidelines for the team. Nothing is set in stone and I’ve often found that it’s unrealistic to have a 100% waterproof plan for more than 3-4 weeks into the future when making games. You’ll constantly need to check in with the team and see how they are doing and adjust the scope or budget of the game accordingly, to avoid stress.
The Importance of Feedback
At Midnight Hub we try our best to give and ask for feedback multiple times when working on each of these steps. Don’t wait until you have completed the whole A section before asking for feedback from your colleagues, which in itself can be stressing. And don’t give feedback about something that the person who worked on it can’t change anymore. Getting (even well justified) feedback when you have closed down the work on a level sucks big time. All that person will likely think about is how many flaws that are in something they’re not allowed to work on for maybe months. Real morale killer. Deliver feedback when there’s still time to act on it.

An example of a level (still work in progress) somewhere between step A and B. The image on the left is even way too done and detailed to be a step A.
Being open and honest about feedback is crucial for this ABC-method to work. It doesn’t work if the people can’t admit when there is a better way of doing something. Foster an atmosphere where people are more focused on which ideas make the game a better game, rather than who specifically came up with a certain idea. Big egos are toxic team killers. In the end, no gamer buying your game will care about who on the team came up with that awesome feature, only that it’s in the game and that it’s fun! We try really, really hard to give and receive feedback at Midnight Hub, and it’s super difficult. Teach your team the basics of how to share and receive feedback, it’s not something that comes naturally to a lot of people. Especially creative people who might feel their worth as humans lie in the creative work they produce. Help people practice how to separate heir worth as humans from what they produce. Diving deeper into “feedback” is a great topic for another blog post.
Enable Your Team To Do Awesome Games!
As a manager or a lead, be prepared to be wrong. Be prepared to listen. Show the team that you’re always willing to reconsider or do things in another way if there’s a good reason for it. That’s how you can evolve the game and your team. If people ask you something you don’t know, just say these magic words: “I don’t have the answer for that right now, let me look into it and get back to you“. People won’t lose respect for you for now knowing it all straight away, they will know that you do your very best to help them out. As a manager or producer, your job is to enable your team to produce the best code possible, to draw the coolest art, to have everything they need to make the most awesome game ever. You’re an enabler.

Our art director Erik working on particle effects for Lake Ridden. The ABC-recipe listed in this article can function as a guideline for how and when to do certain parts of the game, but there will always be things that fall outside of it.
So far I have talked about the advantages of avoiding crunch, about why we want to establish a sustainable way to make games, and our ABC-methodology to help the whole team see what needs to be done and in what order. In the next post, I’ll talk about how and why we felt confident to dial back hours in the office and how we use real-life coins to estimate time when working on the game. And also why “time” and “money” are only two of (at least) six resources you have to balance when making a game.
If you’re curious about Lake Ridden and enjoy puzzle games with plenty of story in them, you can always find our Steam page for the upcoming game here.
Part 1: Avoid Brain Damage From Working With Games
Part 3: Burning Money, Brain Power, and Morale To Make Your Game
Cheers,
– Sara, producer and studio manager at Midnight Hub
“Games hate to be made, and it’s a lot of hard work to bring them into the world.”
Also, the world seems somewhat averse to them. And that started something going in my head for my game project I’ve been trying to get rolling for 10 years now.
Thank you so much Sara. With one sentence you inspired the main conflict in my game.